Converting Color Photos to Black & White
 If you are at all interested in converting your color images to B&W, George Jardine is offering a wonderful free video tutorial – a must see. The first 20 minutes are the definitive tutorials to understand digital theory when converting color to B&W digital. The last 16 minutes provide the many considerations when processing your B&W digital images. The examples, both color theory and photos converted to B&W, are excellent.
I don’t think we need try to memorize all of the different types of conversions George is showing us. We need to realize we keep our color information to vary the B&W tones and that each B&W conversion needs to be treated differently. He does say it’s “not about the numbers but the final result“. At the end of this post is a timeline breakdown of some concepts covered in the tutorial.
Remember, George is showing us “Global” nondestructive HSL adjustments to selective colors values “underneath” your B&W conversion – “Phase 2” in my “4 Phases of Processing the Digital Image” (link to Post to come). Using Phase 3-“Selective“, we can more finely adjust tones in selective areas of our B&W.
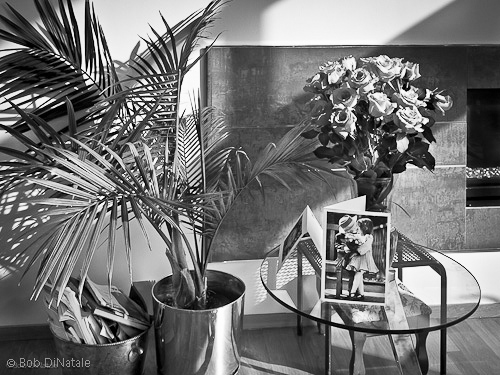
See the examples below:
#1 is a default “GrayScale” conversion; #2 is adjusting B&W with the HSL slides effecting various parts of the scene (notice the dramatic changes in the roses); #3 shows the selective area adjustments. (I also included another #3 showing the masks for the selected areas.)
|
#1-General GrayScale Conversion
 |
#2-HSL Adjustments
|
#3-Selective Adjustments (Mask Areas)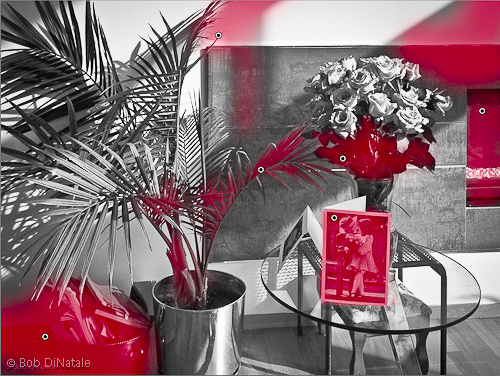 |
#3-Selective Adjustments
 |
Also, let’s not minimize the power and importance of the “Tonal Curve” which George adjusted in every one of his black-and-white conversion.
George Jardine’s Black and White Tutorial Video
09:00 PS’s Black-And-White Adjustment Layer best option other than ACR
10:24 “Auto” in grayscale tries to create as much contrast editing in the photo. Each photo will have different values depending on the colors and tonality of the scene
12:00 “Spectrum.tiff” file great example would be saturated
16:30 “Color Thing” software (only Mac?) is a wonderful tool
18:45 Lab color is based on the way the human eye perceives color and brightness… the “Standard Observer”
19:30 The real how to start here! … And of course Lightroom! (although PS users can use ACR plug-in)
19:45 The most important thing in conversions is contrast and a good black and white point
20:30 “first thing I do is choose try to black-and-white conversion” whether auto or defaults depends on how you have you Lightroom preference is set
27:30 “flat mid-tones are a giveaway for digital image”… that is why most digital photographs benefit from a increasing the “Clarity” slider to the right.
34:15 “learn to trust your eyes and forget what the numbers on the sliders are
”
[Reply]