LR’s Adjustment Brush – Observations, Revelations & Evolutions
There have been some complaints about performance issues with the AB. It is a memory hog for sure but the performance issue seems to be system-based and influenced by your graphic card and its settings. That being said, you can’t deny the powerful creative localized tool that the AB is, so let’s continue…
Evolution #0:

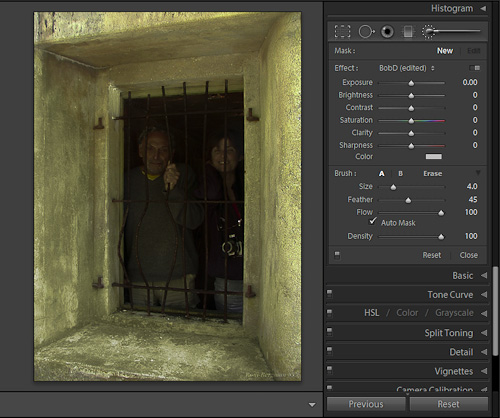
Adding an effect with the AB at times can be challenging, not just because of the performance issue above, but sometimes the effect is hard to notice… especially if the effect is subtle. When I first started using this new AB tool, I would exaggerate the effect: e.g. Exposure -4; Saturation +100; Sharpen +100. Using these exaggerated settings, I could follow creating my AB effect more easily. Once done selecting the area, I would pull back my settings to an image appropriate level. Most of the time this worked but then I had a revelation which I call Evolution #1.
Evolution #1: {Make and save a custom “Effect” to use when adding an AB selection}

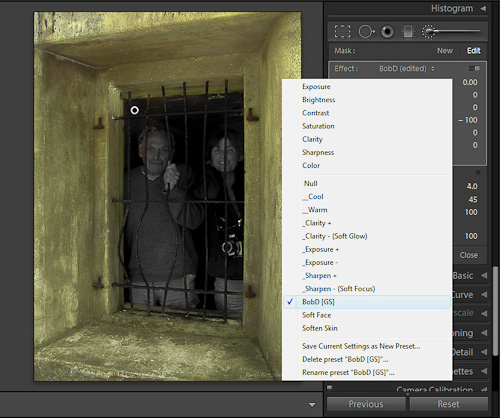
I made a custom effect where I changed only the “Saturation” to -100 which made it very exaggerated. I saved this setting as “BobD [GS]” and used it when adding an AB selection. This was neat because when I used the AB brush with this setting, I actually “painted in grayscale”. This was helpful because it was very easy to view the area being created. Once I was done with my selection, I would reset my “Saturation” to 0 (double clicking on the slider’s pointer) and, from my growing experience, type in the desired effect… like Exposure = “-.66” (-2/3 stop) or Clarity = 50… or both, etc. This worked out well.
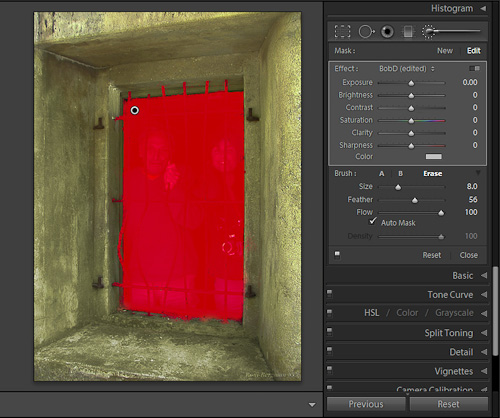
Periodically I would check my selected area by hovering my cursor over the AB “pin”. This would show the affected AB area in red. Do to the performance issue stated above, this hovering started to get a little tedious. So, I would press the letter “O” on the keyboard to “toggle” the red color mask on/off. This led me to another revelation, you guessed it – Evolution #2.
Evolution #2: {Paint my selection with the mask area “toggled on”}

Why use my saved desaturated “BobD [GS]” setting at all… why not paint my selection with the red mask “toggled on” by pressing the “O” key before starting my selection! Which I do! This makes it really easy to follow the selected localized correction area. Why, it even makes correcting this area using the erase brush much easier. Well, easier if you weren’t painting a red mask on a red apple – very hard to see. (Note: “Quick Tip” below)
The skinny of this evolution is, if you “toggle on” your mask it makes selecting your desired area much easier. Once selected, press “O” to “toggle off” the mask and type in the effect then adjust settings for the current image. Now, this is pretty good but the typing started to get a little repetitive which led me to my next revelation I call Evolution 2a (ok, not such a big change)
Evolution #2a:{Change localized effect with saved presets}

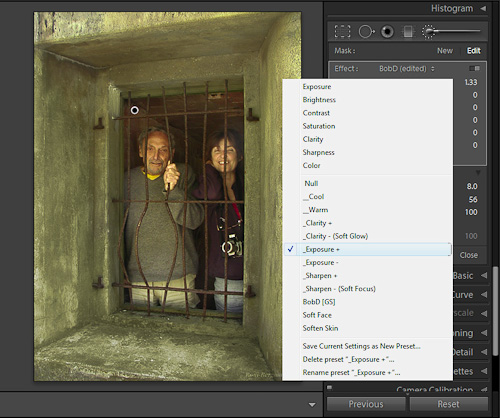
Painting with the mask “toggled” on, I no longer needed my “BobD [GS]”effect, (a.k.a. Evolution #1). However, it did lead me to create other localized Preset effects (more exaggerated than the LR defaults) like, Warm; Cool; Exposure+; Exposure -; Clarity+; Clarity- (Soft Glow); Sharpening+; Sharpening- (Soft Focus); etc.. As in Evolution 2, I paint my localized selection with the mask “toggled on”. Now, instead of typing my effect, I simply pull down my list of Presets and selected the desired effect. I then do subtle adjustments for the current image. (BTW, these saved Preset effects are also available when using the Graduated Filter tool.)
Quick Tip: Using AB with the Mask “toggled on”
The clever LR development team anticipated painting a red mask on a red apple. So, by pressing “Shift” + “O” on the keyboard, you will toggle through colors from “red” to “green” to “light gray” to “off” and then back to “red” again. (Watch out for the “off” setting – it is like toggling on an invisible mask, if you stop here… there could be confusion!)
L,O.R.E.
Well, that’s it until the next post. In the meantime I will continue working with
Lightroom, Observing Revelations and Evolutions!
<< End >>
![[Click on photo to enlarge detail]](http://bobd.tv/wp-content/uploads/2011/09/AB21.jpg)